Learning how to draw couches can be an exciting journey, whether you're a beginner or an experienced artist looking to refine your skills. From sketching the basic shapes to adding intricate details, creating a realistic couch drawing requires patience and practice. But don’t worry—we’ve got your back! This comprehensive guide will walk you through every step of the process so you can create stunning couch illustrations with ease. So grab your pencil and let’s dive right in!
There’s something magical about drawing furniture like couches. It’s not just about creating a simple object—it’s about bringing life to everyday items that we often take for granted. In this article, we’ll explore how to draw couches from different perspectives, styles, and even textures. Whether you’re into minimalist designs or detailed, ornate pieces, there’s something here for everyone.
Before we jump into the nitty-gritty details, remember that practice makes perfect. Even if your first attempts don’t look exactly like the couch in your living room, keep at it! With each stroke of your pencil, you’ll improve and develop your own unique style. Let’s get started!
- Zorbi Magic Flying Saucer The Ultimate Fun Toy For Everyone
- Wall Clock Shopee Your Ultimate Guide To Stylish Timepieces
Here’s a quick overview of what we’ll cover:
- Understanding the Basics of Drawing Couches
- Tools You’ll Need to Start Drawing
- Step-by-Step Guide on How to Draw a Couch
- Exploring Different Couch Styles and Designs
- Drawing Couches in Perspective
- Adding Texture to Your Couch Drawing
- Tips and Tricks for Perfecting Your Couch Art
- Common Mistakes to Avoid
- Practicing with Real-Life Examples
- Final Touches and Enhancements
Understanding the Basics of Drawing Couches
Let’s start by breaking down the fundamentals of how to draw couches. Every piece of furniture has its own unique structure, and understanding these elements is crucial for creating realistic drawings. A couch typically consists of a frame, cushions, arms, and legs (if it’s not a sectional sofa). These components may vary depending on the style and design of the couch, but the basic principles remain the same.
One key aspect of drawing couches is mastering proportion. You need to ensure that the seat, backrest, and armrests are in harmony with one another. Think of it as building a house—if the foundation isn’t solid, the entire structure will collapse. Similarly, if the proportions of your couch aren’t balanced, the final drawing won’t look convincing.
- How To Play Timbiriche The Ultimate Guide For Fun And Excitement
- Hello Kitty Mums The Ultimate Guide To The Iconic Character And Its Impact On Moms Worldwide
Why Learn How to Draw Couches?
Learning how to draw couches isn’t just about creating artwork—it’s also a great way to enhance your observational skills. By studying the shapes, lines, and textures of a couch, you’ll become more aware of the details in everyday objects. Plus, mastering this skill can open doors to other types of furniture drawings, allowing you to expand your artistic repertoire.
And hey, who knows? Maybe one day you’ll design your dream couch instead of just drawing it!
Tools You’ll Need to Start Drawing
Before you start sketching, make sure you have the right tools. Here’s a list of essentials that every aspiring couch artist should have:
- Pencils (HB, 2B, 4B, and 6B for varying shades)
- An eraser (both kneaded and regular)
- A ruler (optional, but helpful for straight lines)
- Sketch paper or a drawing pad
- Blending tools like tortillons or blending stumps (optional)
While some artists prefer digital tools, starting with traditional methods is always a good idea. It helps you develop a strong foundation in shading, texture, and line work. Once you’re comfortable with pencil and paper, you can always experiment with digital platforms like Procreate or Adobe Fresco.
Step-by-Step Guide on How to Draw a Couch
Now that you’re equipped with the basics, let’s dive into the step-by-step process of drawing a couch:
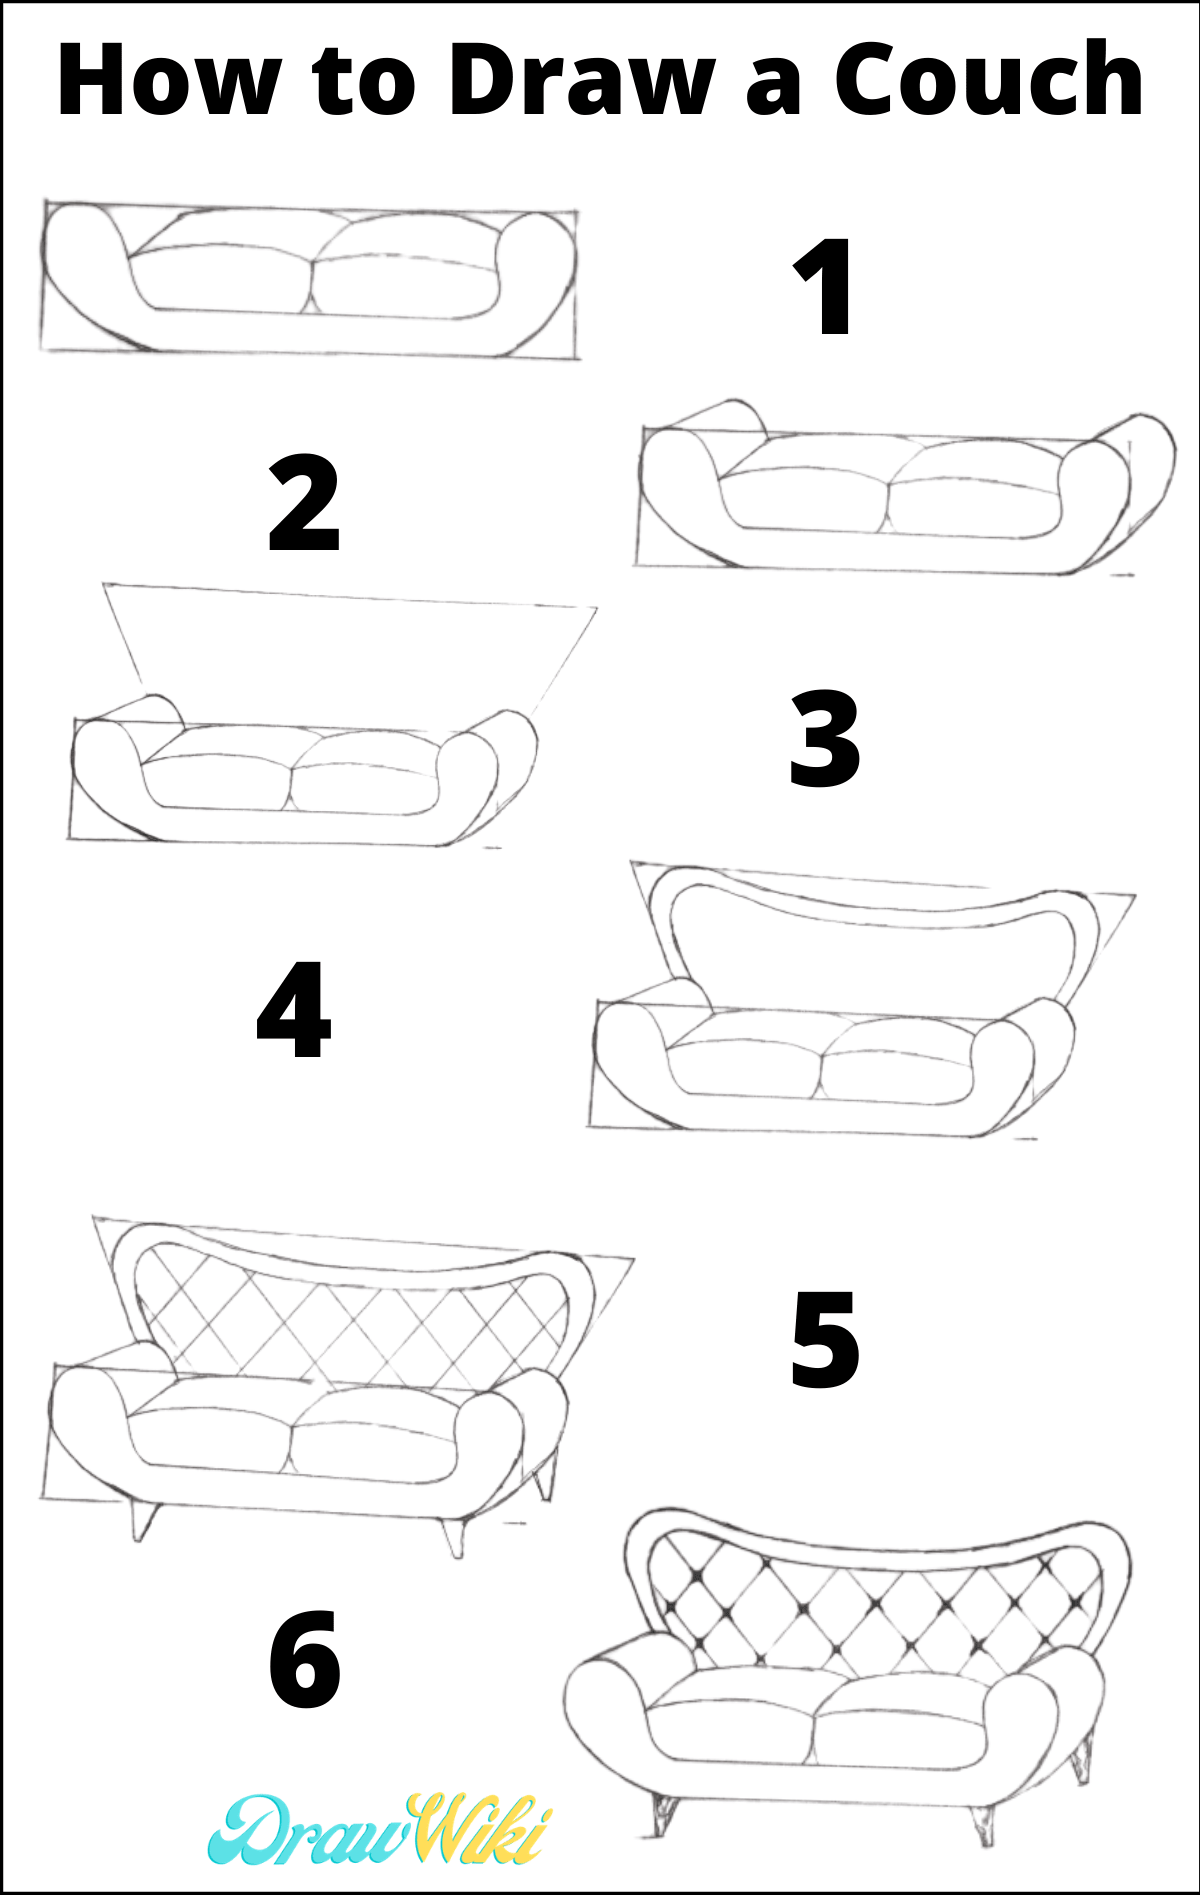
Step 1: Sketch the Basic Shape
Begin by lightly sketching the overall shape of the couch. Use simple geometric shapes like rectangles and ovals to outline the frame, seat, and backrest. Don’t worry about perfection at this stage—just focus on getting the proportions right.
Step 2: Add the Details
Once you’ve established the basic shape, start adding details like cushions, armrests, and legs. Pay attention to how these elements interact with one another. For example, the cushions should sit evenly on the seat, and the armrests should be proportionate to the rest of the couch.
Step 3: Refine the Lines
Erase any unnecessary guidelines and refine the outline of your couch. Make sure the edges are clean and sharp. If you’re using a ruler, now’s the time to add any straight lines for added precision.
Step 4: Shade and Texture
This is where your drawing really comes to life! Use different pencil grades to add shading and texture. Start with light strokes and gradually build up the darkness. Remember to consider the light source—this will determine where the shadows fall.
Exploring Different Couch Styles and Designs
Not all couches are created equal! From classic Chesterfields to modern sectional sofas, there’s a wide range of styles to choose from. Here’s a quick rundown of some popular couch designs:
- Chesterfield Couches: Known for their deep button tufting and rolled arms, these couches exude elegance and sophistication.
- Sectional Sofas: Perfect for large spaces, sectional sofas offer flexibility and comfort with their modular design.
- Mid-Century Modern: Characterized by clean lines and tapered legs, these couches have a timeless appeal.
- Recliner Couches: Ideal for relaxation, recliners combine functionality with style.
Experimenting with different styles will help you develop your own unique artistic voice. Don’t be afraid to mix and match elements to create something entirely new!
Drawing Couches in Perspective
Learning how to draw couches in perspective is essential for creating depth and realism in your artwork. Perspective drawing involves understanding how objects appear to the eye based on their spatial attributes. Here are a few tips to get you started:
- Use a vanishing point to guide your lines.
- Pay attention to the angles of the couch’s edges.
- Practice drawing couches from different viewpoints, such as above, below, or at eye level.
By mastering perspective, you’ll be able to create dynamic and engaging couch drawings that pop off the page.
Adding Texture to Your Couch Drawing
Texture is what gives your couch drawing depth and character. Whether you’re drawing a plush velvet couch or a rugged leather sofa, paying attention to texture can elevate your artwork to the next level. Here’s how you can add texture to your drawings:
For Velvet Couches:
Use soft, flowing lines to mimic the luxurious feel of velvet. Avoid harsh edges and focus on creating a smooth, velvety appearance.
For Leather Couches:
Incorporate subtle creases and wrinkles to capture the natural wear and tear of leather. Use darker shades to emphasize the folds and crevices.
Remember, texture isn’t just about the material—it’s also about the lighting. Consider how the fabric interacts with the light source to create realistic shading.
Tips and Tricks for Perfecting Your Couch Art
Here are some additional tips to help you refine your couch-drawing skills:
- Study real-life couches to understand their structure and details.
- Practice sketching quickly to improve your hand-eye coordination.
- Don’t be afraid to make mistakes—they’re part of the learning process!
- Experiment with different shading techniques to find what works best for you.
Consistency is key when it comes to improving your art. Set aside time each day to practice, even if it’s just for a few minutes. Over time, you’ll notice significant progress in your skills.
Common Mistakes to Avoid
Even the most talented artists make mistakes from time to time. Here are a few common pitfalls to watch out for:
- Ignoring Proportions: Ensure that all parts of the couch are in proportion to one another.
- Overworking the Details: Sometimes less is more. Avoid cluttering your drawing with unnecessary details.
- Forgetting the Light Source: Always consider where the light is coming from to create realistic shading.
By being mindful of these mistakes, you’ll be able to create more polished and professional-looking couch drawings.
Practicing with Real-Life Examples
One of the best ways to improve your couch-drawing skills is by practicing with real-life examples. Find a couch in your home or take a trip to a furniture store and sketch what you see. Pay attention to the unique features of each couch and try to replicate them in your drawing.
Photographs can also be a valuable resource. Use high-quality images to study the details and textures of different couches. Just remember to give credit where credit is due if you’re using someone else’s photos as reference material.
Final Touches and Enhancements
Once you’ve completed your couch drawing, it’s time to add the final touches. Take a step back and evaluate your work. Are there any areas that need improvement? Do the proportions look balanced? Is the shading consistent?
If you’re happy with the overall result, consider enhancing your drawing with color. Use colored pencils, markers, or watercolors to bring your couch to life. Experiment with different color palettes to see what works best for your style.
Conclusion
Learning how to draw couches may seem daunting at first, but with practice and patience, anyone can master this skill. By following the steps outlined in this guide, you’ll be well on your way to creating stunning couch illustrations that showcase your unique artistic style.
So what are you waiting for? Grab your pencils and start sketching! And don’t forget to share your creations with the world. Whether it’s on social media or in a physical portfolio, showcasing your work is an important part of the artistic journey.
Happy drawing, and remember—practice makes perfect!
- What Does Leslie Sansone Look Like Today Discover The Queen Of Walking Workouts
- Frutiger Aeronostalgia Outfit A Journey Back In Time